Ally Called Me to Upload More Documents
Add files, images, audio, and video
On the Form Content page, you can browse for files in cloud storage or on your figurer. In some cases, students select the file proper noun to download and open up it. If allowed past the browser, some media files open in a new window or tab. Students are notified in their activity streams when you add content.
In about browsers, y'all can select where the files that you lot open up in courses are downloaded. For example, in Chrome, navigate to Settings > Advanced > Downloads. You can select the location for file downloads and choose if yous want the browser to ask each fourth dimension. In Safari, you accept the same capabilities. Navigate to Preferences > Full general > File download location. Yous can perform an cyberspace search to learn about file download choices in other browsers.
Supported file types include Doctor, DOCX, HTM, HTML, MP4, MPG, PDF, PPT, PPTX, XLS, XLSX, RTF, TXT, Nada, and about image types.
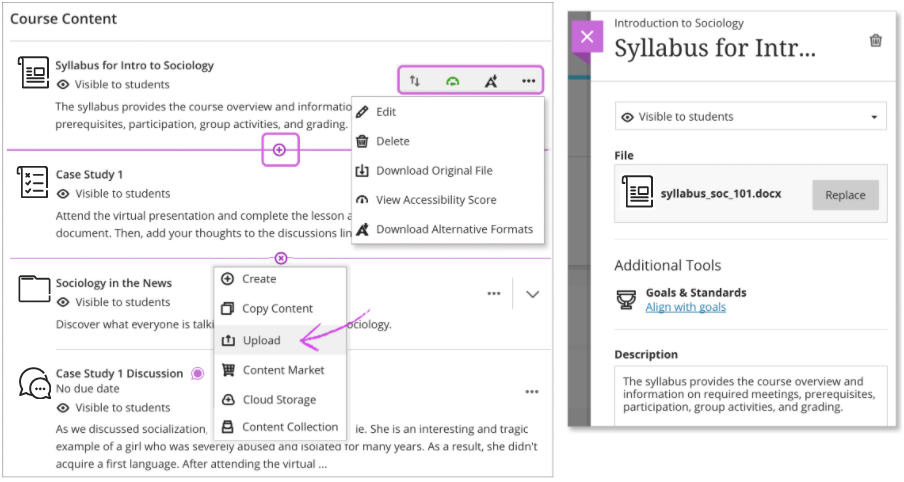
Upload files. Select the plus sign wherever you want to upload files. In the carte, select Upload to browse for files on your computer. The files appear in the content listing.
Open a file's menu to edit the file name, align with goals, replace the file, or add together a clarification. You lot can as well expand or create a folder or learning module and then upload files.
If your institution uses Blackboard Ally, you can use the tool to be certain your course content is attainable to every pupil. Accessibility score indicators and alternative formats appear next to files. Learn more most Ally later in this topic.
Add files from cloud storage. If y'all already accept files stored in the cloud, such as in OneDrive® and Google Drive™, you tin can add together them to your form. You may cull multiple files from cloud storage to add together to your Class Content folio in ane action. The files y'all add together are copies. If yous make a change to a file in cloud storage, you need to upload a new copy in your class.
More on cloud storage
Add files from the Content Drove. If yous already accept files stored in the Content Collection, you can add to them in your grade.
Copying and pasting links from the URL bar to Images, PDFs, or other Files in the content collection won't office properly. These URLs are temporary and break later.
More on adding files from the Content Collection
Control what students see. All content is hidden from students until you decide to evidence it. Each item displays if information technology's visible or hidden from students. Select the visibility to change information technology.
With your keyboard, tab to the visibility listing and press Enter to open the carte du jour. Apply Alt/Selection + the upwardly and downwards arrows to select an pick.
Add together goals and standards. You and your institution can use goals to measure educatee achievement across programs and curriculums. After you lot successfully upload a file to your course, yous can align 1 or multiple goals. Open the menu in the file'due south row and select Edit. In the console, select Align with goals to search for bachelor goals to align with the file.
Students can't see the goals you lot marshal with a file.
Reorder, edit, and delete content hands. Point to an item to reveal the Move icon and drag the item to a new location in the content list. Open the bill of fare and select Edit or Delete. For example, in the console, you can alter a file's name, blazon a description that appears with the file on the Grade Content folio, or replace the file.
With your keyboard, you can move an detail to a new location, move an item into an expanded folder, and movement a binder into another expanded folder.
- Tab to an item's move icon.
- Press Enter to actuate move mode.
- Utilise the arrow keys to choose a location.
- Press Enter to drop the item in the new location.
Zip files
On the Grade Content page, you can upload a compressed packet of files, also called a Nothing file. Students select the ZIP file to download it to their computers and unzip it to access the contents. In the menu, select Upload to scan for the file on your figurer.
Ally in Acquire - Instructor
View and improve content accessibility
Your institution controls which tools are available.
Your grade is full of diverse students with unique learning abilities. Providing students with more than accessible content means each private can choose formats that work best for them. If your institution uses Blackboard Ally, you can utilize the tool to help ensure your form content is accessible to every student.
Accessibility score indicators and alternative formats appear side by side to course documents and tests.
Become started with Ally
- Find the content yous want to improve.
- Next to the content is an icon that shows the accessibility score.
- Select the score icon to learn how to meliorate the accessibility score.
- Marry opens and shows you steps on how to edit your content for improved accessibility and optimize information technology for alternative formats.
How to improve accessibility in course content

Students don't see the content's accessibility score. Instead, students tin can choose from the alternative formats Ally generates for the content. Y'all can assistance Ally create better culling formats by following best practices for creating accessible content.
View alternative formats
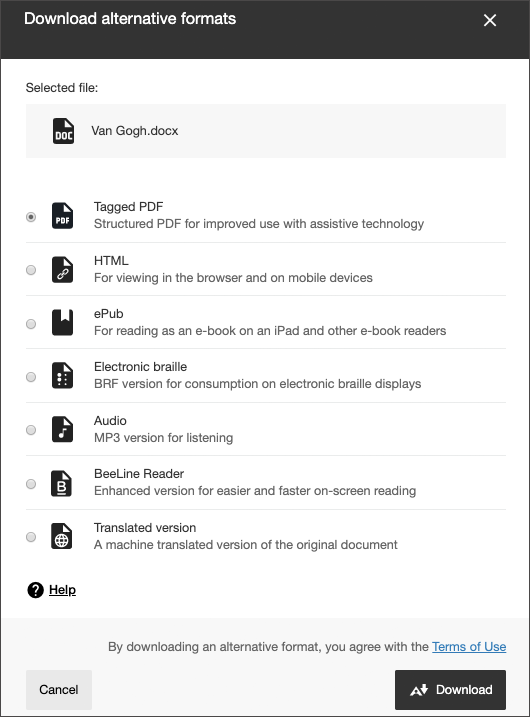
After y'all add together content to a grade, Ally creates alternative formats of the content based on the original. For instance, if the original content is a PDF, Ally creates audio, electronic braille, and ePub formats of the same content. These formats are made bachelor with the original file so everything is in one convenient location.
The alternative formats created depend on the original content blazon. If yous don't see an choice to download alternative formats, Ally isn't enabled for that course or the content isn't a supported content type.
Notice content in your grade. Select the menu beside information technology and select Alternative Formats. Choose the version that is best for your needs! Select Download to save the alternative format to your device.
More than on alternative formats for course content
Insert files in the editor
Y'all tin can upload files in the editor in certain areas of an Ultra class. For example, yous tin include an image or a document to assist students understand your instructions or initial prompt.
The editor simply supports inline viewing for videos in MP4 format. You may need to download videos that apply other file types, such as MOV or MPEG. You can't add attachments in the editor in calendar items.
Select Insert/Edit Local File. Scan for a file from your calculator. A status window appears to testify the progress of the file upload. You tin too add files from cloud storage, such as OneDrive.
You can edit the file's settings, including the display name, alternative text, and brandish behavior. Choose whether to insert the file equally a link in the editor or to embed the file direct then it appears inline with other content you've added.

To edit the file'due south alternative text or display behavior, select the file in the editor and so select the Edit Attachment icon.

Insert images in the editor
In some areas of an Ultra course, yous tin employ the editor functions to add images forth with text content. You can add together images that are hosted online or you tin upload an prototype from your local drive.
If y'all add a large image, it'south a practiced idea to include the paradigm every bit a split text link. This fashion, your students can select the link to view the paradigm separately and more than conspicuously, while withal able to read your text.
At this time, you tin't add together images in the editor in calendar items.
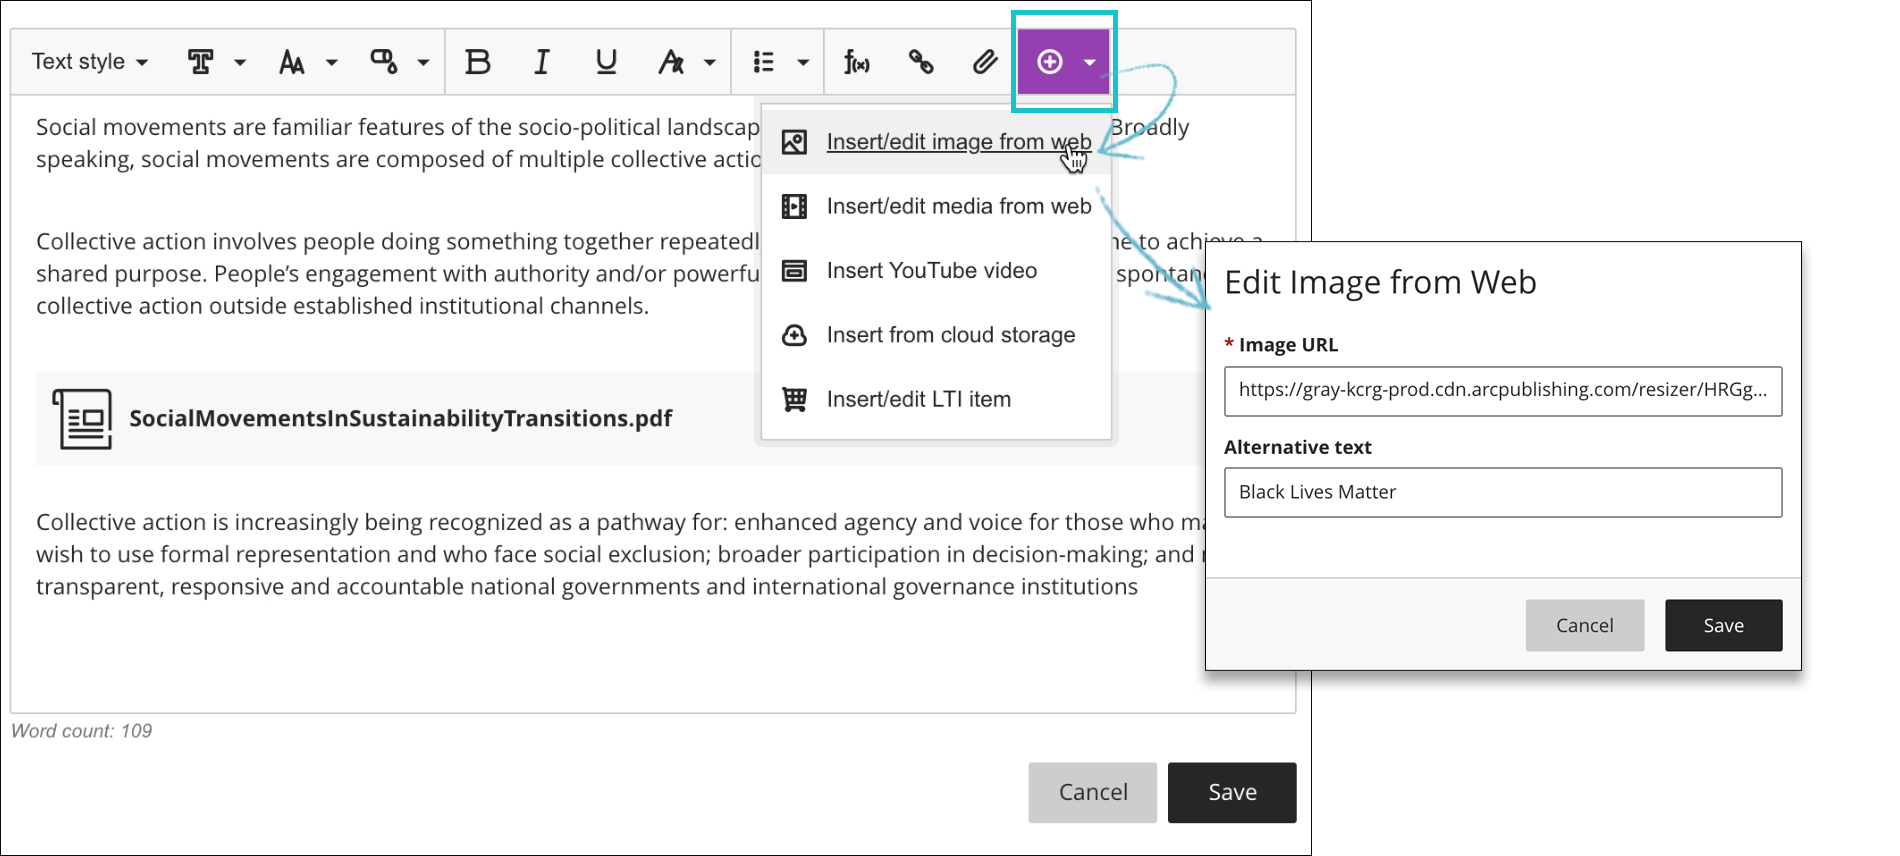
Select Add Content > Insert/Edit Image from Spider web. Blazon or paste an image URL to embed an image hosted online. You must use the http:// protocol. Include a description of the image in the Alternative text box and then users who tin can't view the image are able to understand the image'due south importance.
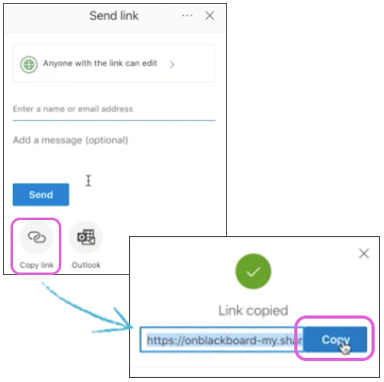
Add Office 365 files. Yous can embed enterprise Office365 files directly into your content. Select Share in your Office365 file to create a link to the file. Choose which permissions you lot want the user to take and select Copy Link. This copies the link to your clipboard. To embed the content, selectInsert/Edit Media from Spider web from the editor. Paste the link in Media URL.Select Insert.
To edit the image's source or alternative text, select the image in the editor and so select Insert/Edit Image from Web.
Insert media in the editor
You can apply the Insert/Edit Media from Spider web pick to insert media and enterprise Office365 files directly into the editor. The editor automatically embeds the content so it appears with other content you include. Students can view the content, such every bit a video, within the same window—no demand to navigate to the media's site.
You can embed content from these sites:
- VidGrid
- Panopto™
- FlipGrid
- SlideShare
- Prezi
- VoiceThread
- Khan University
- Kaltura
- SoundCloud
- Spotify®
- Genial.ly
- NearPod
- Quizlet
- EdPuzzle
- H5P
- Vimeo®
- YouTube™
- Office365

- In the editor, select Add together Content > Insert/Edit Media from Web.
- Paste the source URL from the site.
- Add together alternative text that describes the item for people who use screen readers or may not be able to load the content.
- Select Insert. The item automatically embeds in the editor.
Insert YouTube video
Use the Insert YouTube Video option to browse and add YouTube videos directly in the editor. No demand to go out your course to notice a link! You can choose to display the video as a link or to embed the video then information technology appears alongside the other content you include. Students can sentry the video within the aforementioned window—no need to navigate to YouTube.

More on inserting YouTube videos
Insert a feedback recording in the editor
You tin can embed audio and video recordings of your feedback in the editor equally y'all course attempts. The recording option appears in the feedback editor for most graded items in your course. Students watch or listen to your feedback aslope any text you include.
This function isn't supported on all browsers. For the all-time experience, use Chrome or Firefox.
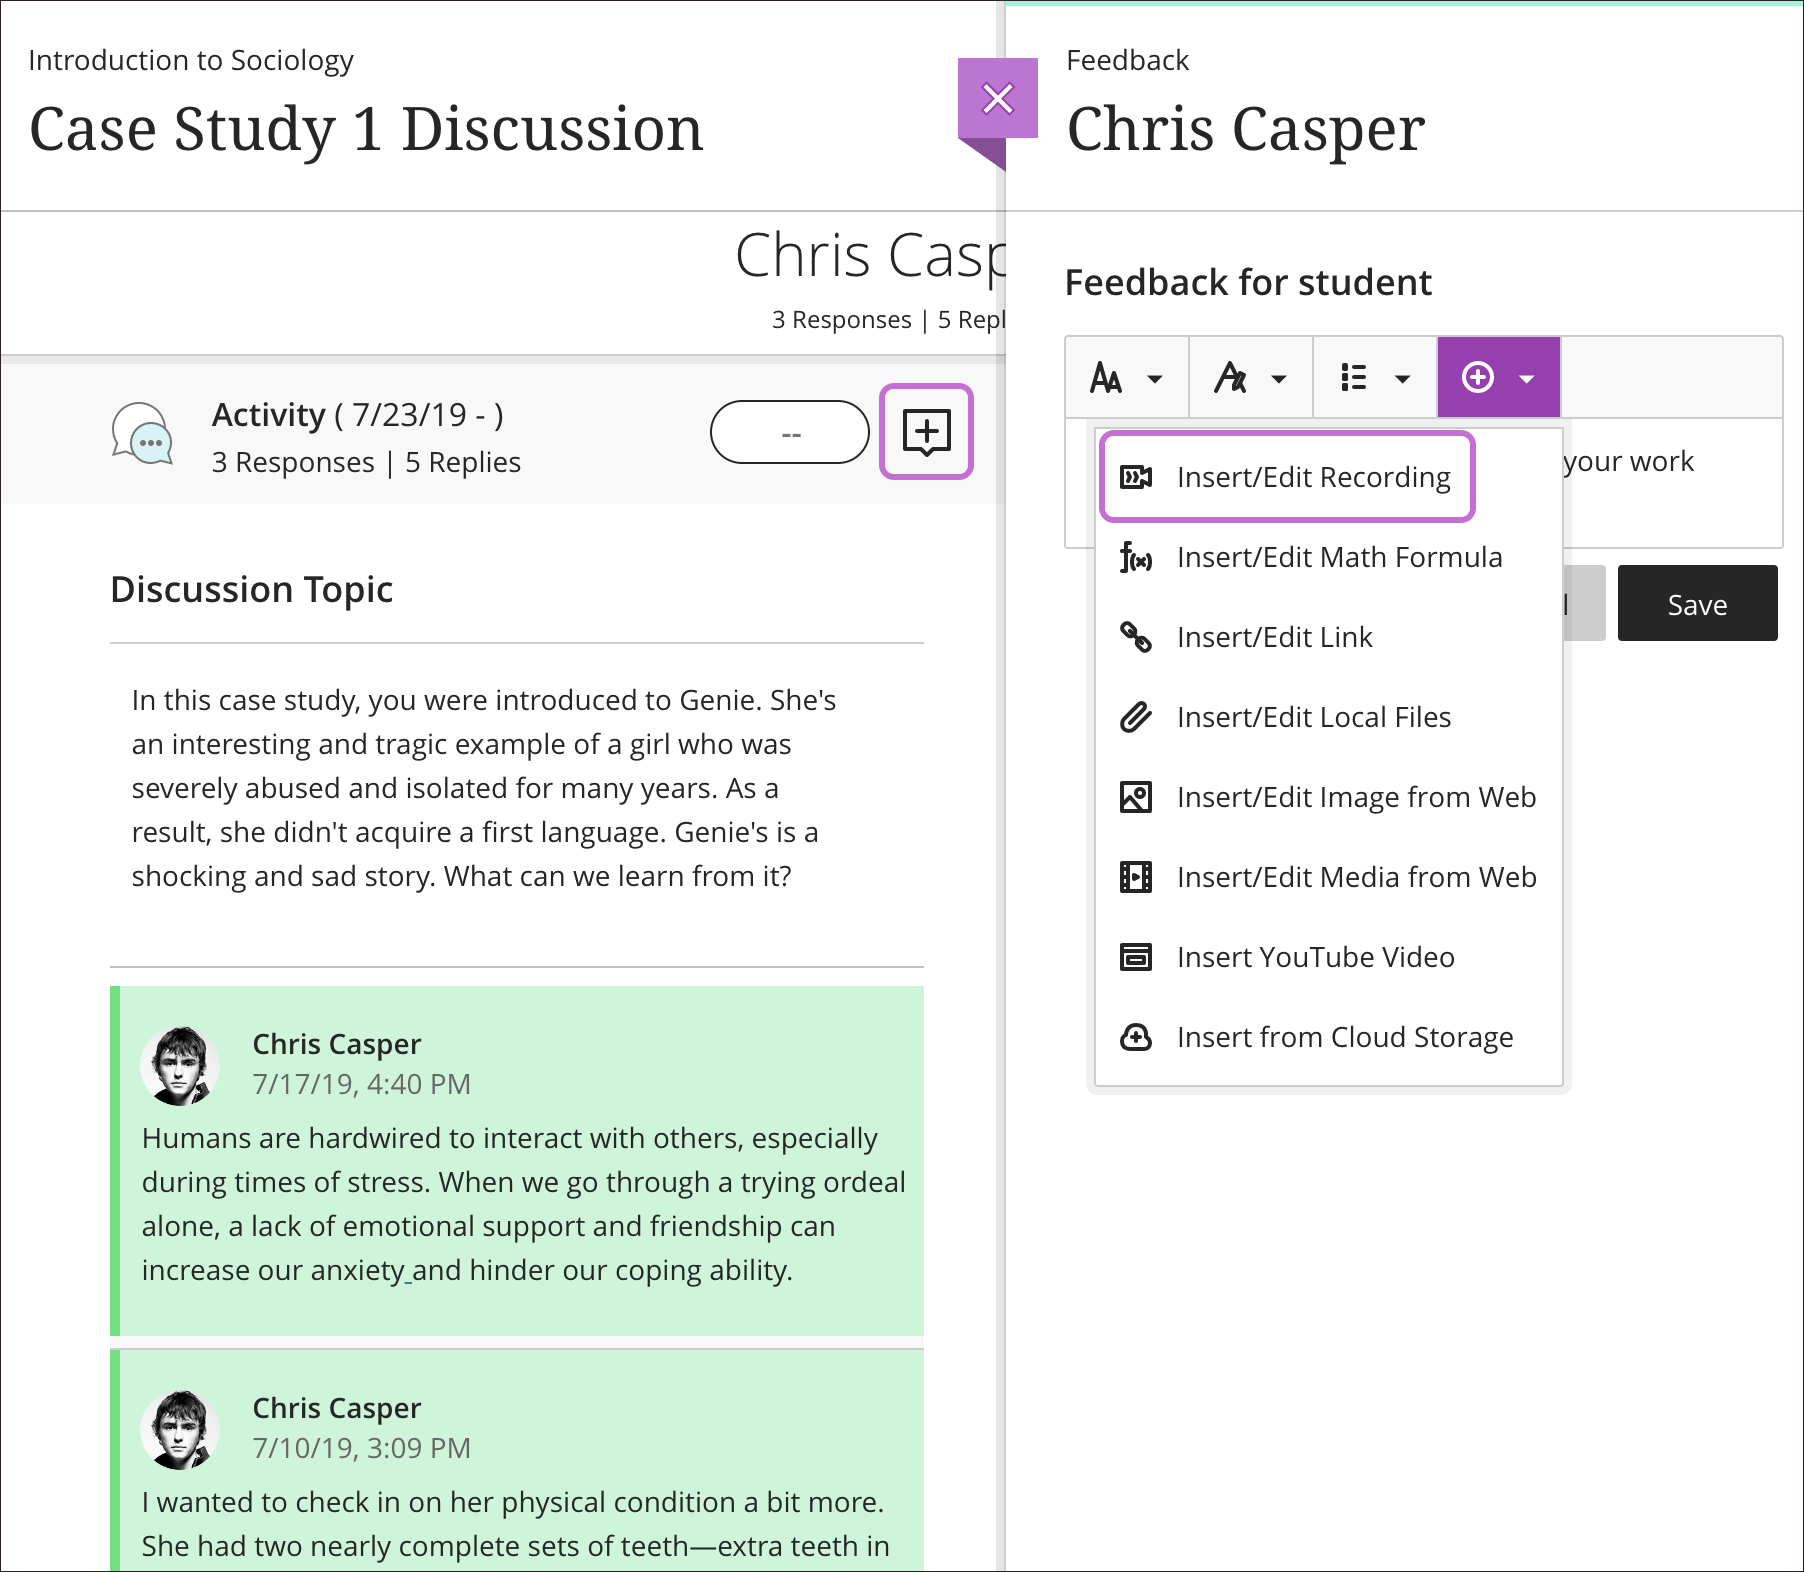
More on adding sound/video feedback
Insert Content Market files
Your institution controls which tools are bachelor.
The Content Market place is your gateway to valuable learning materials from trusted content providers. You lot can also access tools and links your administrator has made bachelor across your establishment.
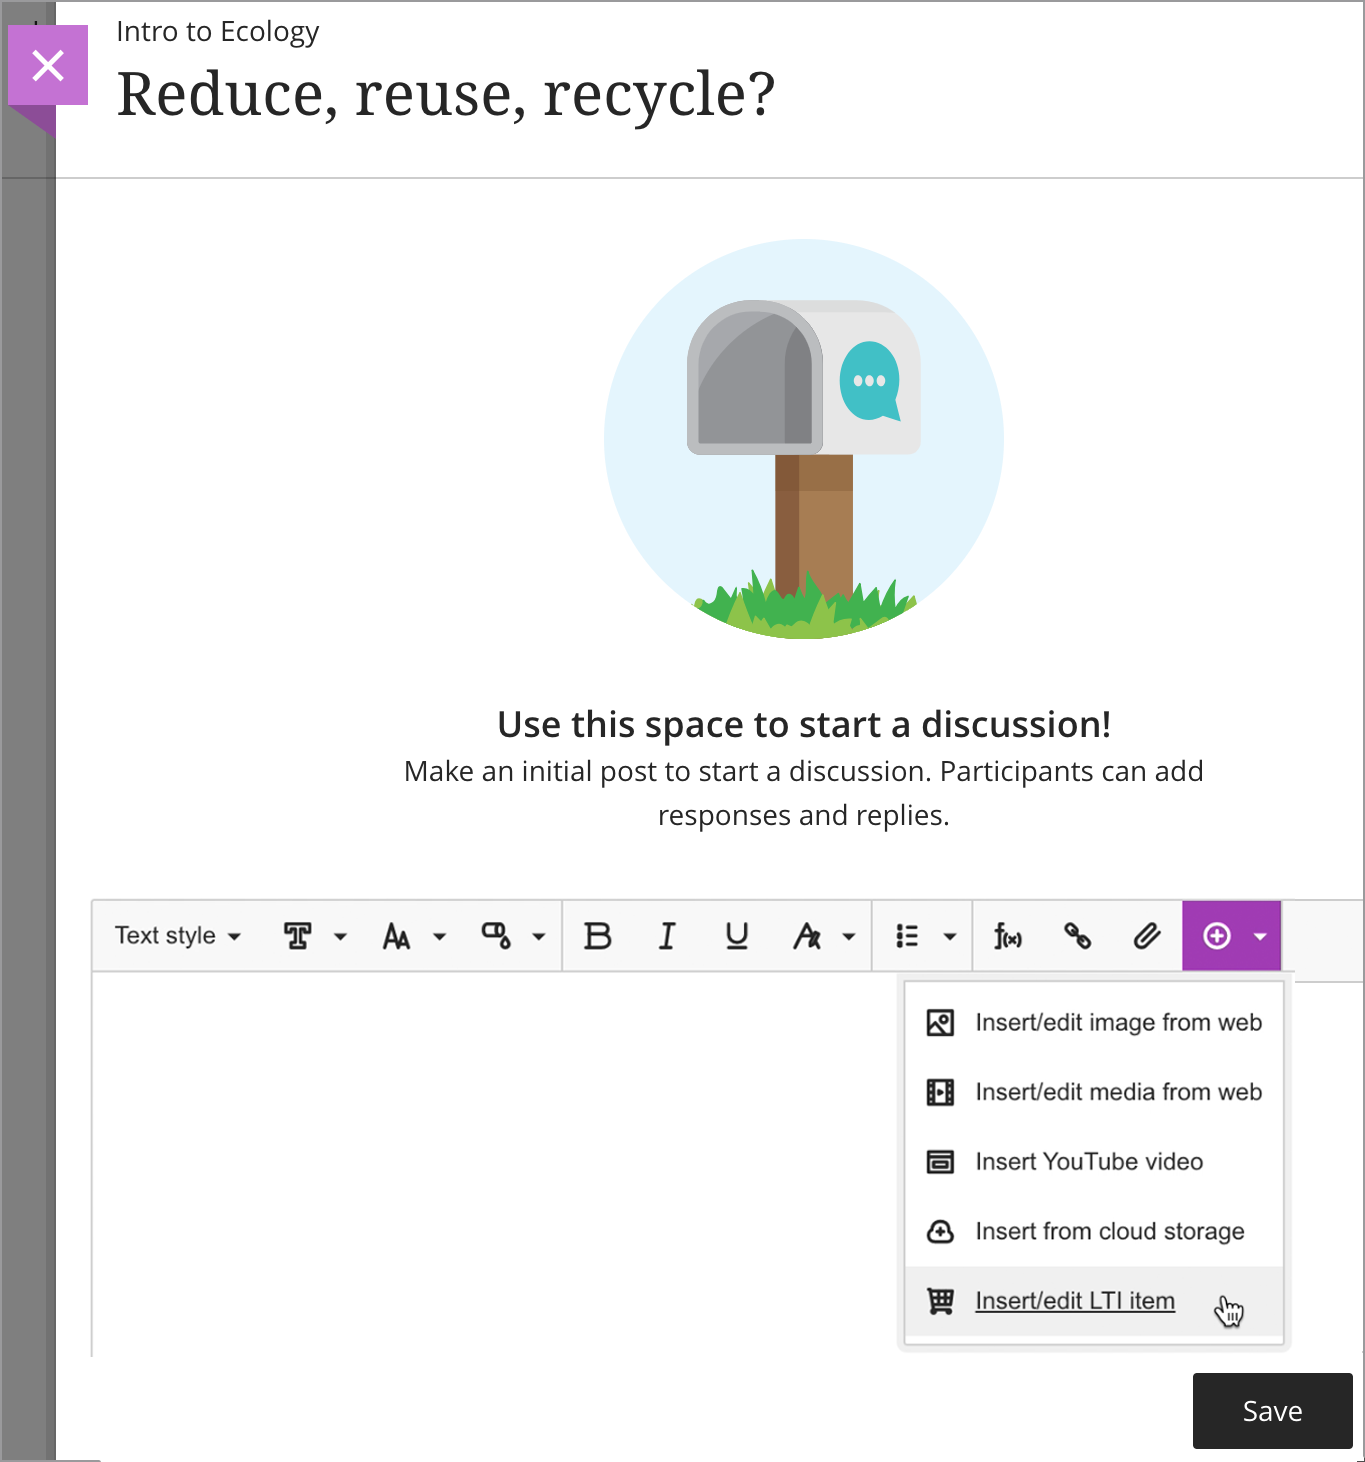
You can add together content from the Content Market direct to the editor in your course's assignments, tests, and documents. In the editor, select Insert content > Insert/Edit LTI Item.
Select a tool to launch and scan for content to add. Or, select the plus sign on the Institution Tool'southward card to add the entire tool in the editor. When you lot add together a tool or a piece of content to the editor, information technology appears as a link.
More on the Content Market place
Add together files from the Content Collection
Yous can use the Content Collection to organize, share, and reuse files in your courses and those files shared institution-wide. You lot can add files from the Content Collection correct on the Course Content folio. Select the plus sign wherever you want to add files. In the menu, select Content Collection to scan the files available to you and add them to your course.
Y'all can also find the Content Collection in the Import Content panel. Select Content Collection to scan the files available to you and add them to your course. To speed up the process, you can select multiple files to add at one time.
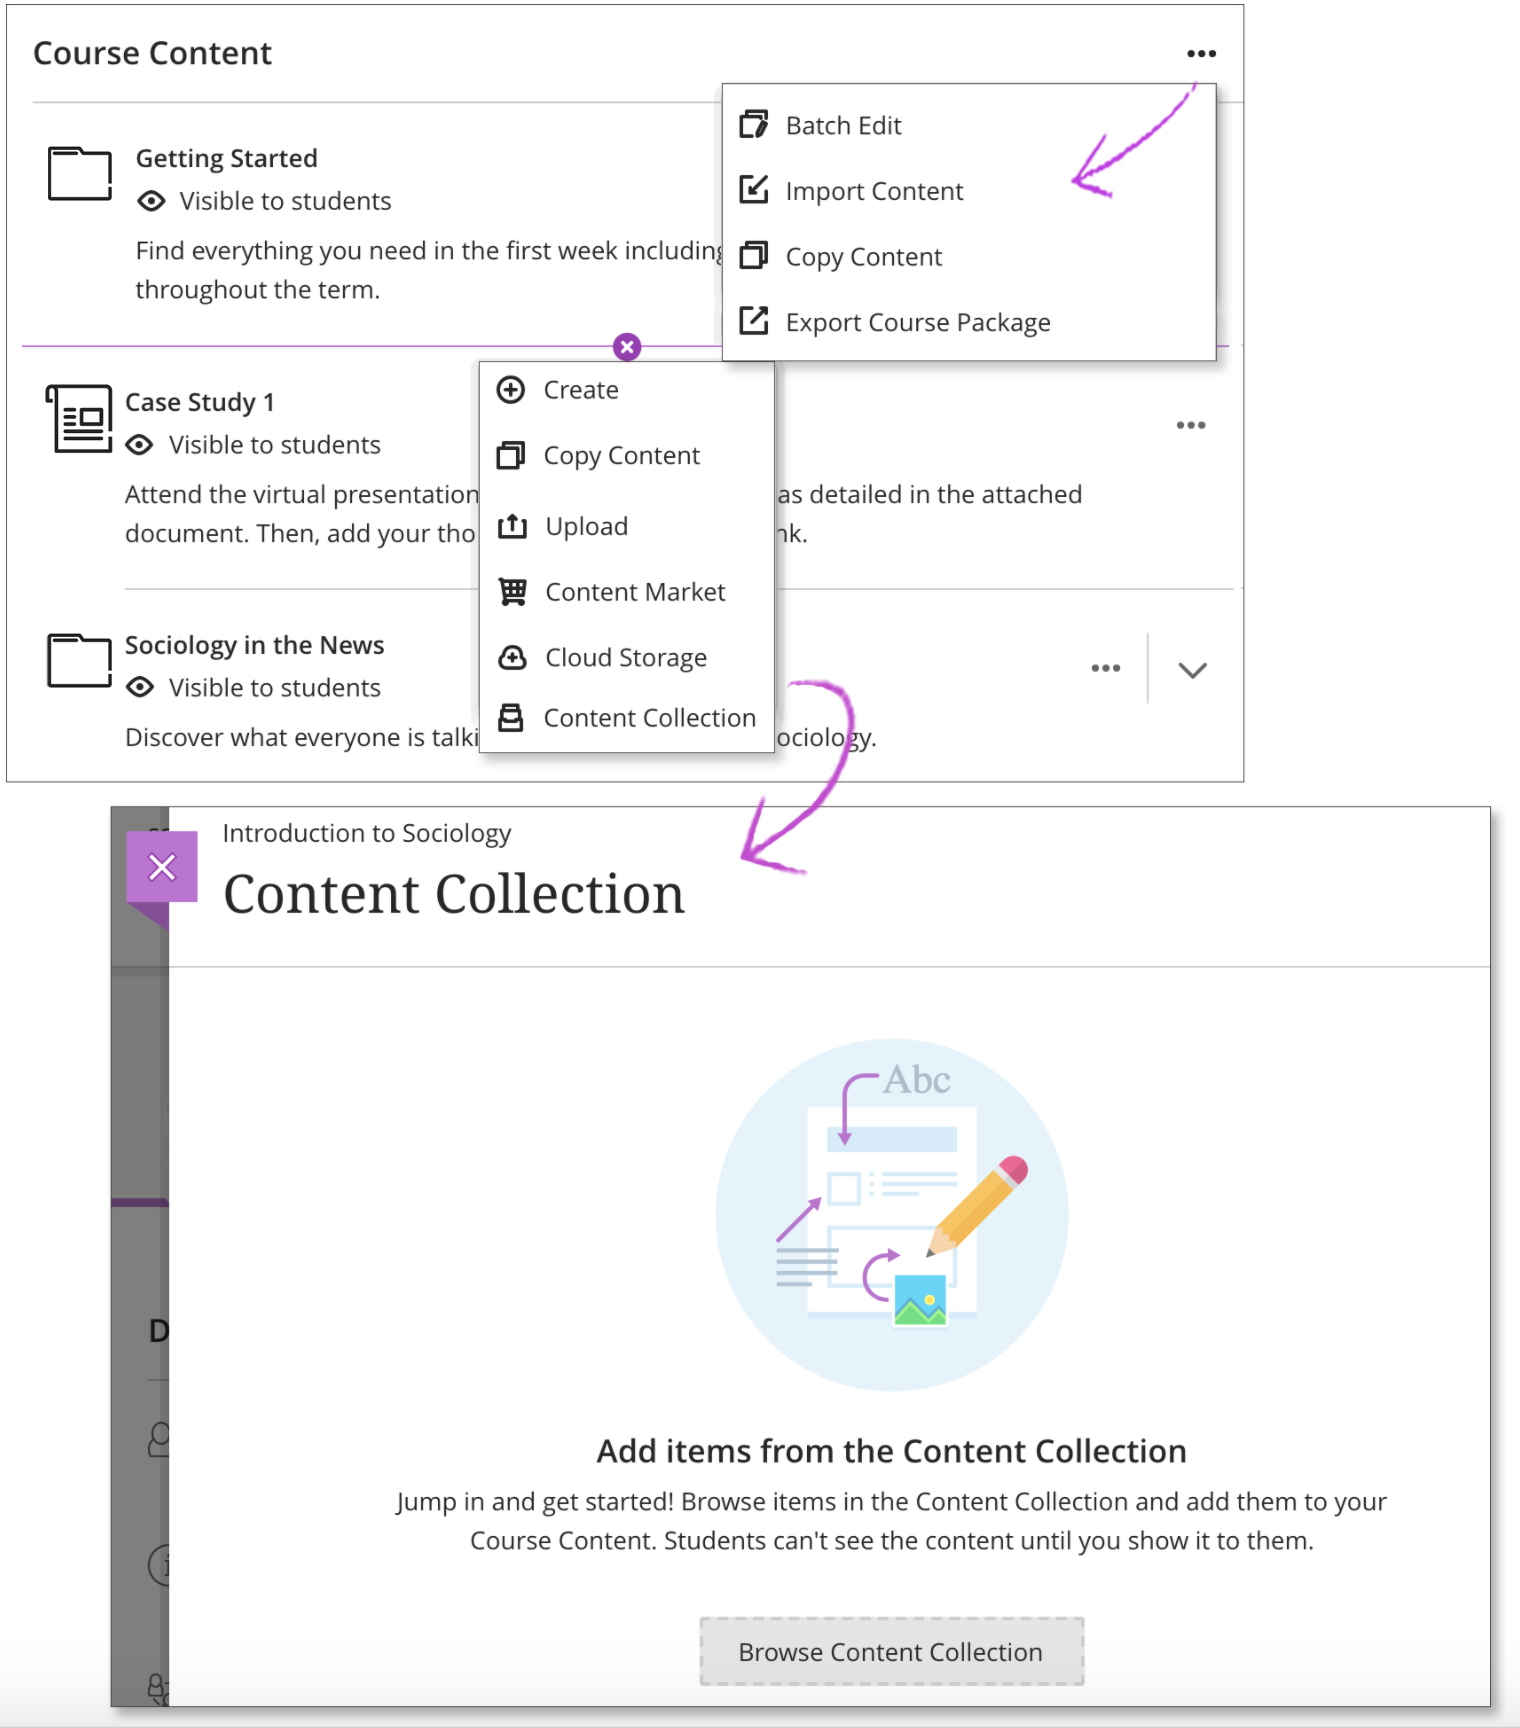
Select Browse Content Collection to get started. You're brought to the Content Collection organisation, where you can find files stored hither from your other courses. You'll also have access to files your institution has added and shared. Use the browse functions to explore.
The first fourth dimension you open the Content Drove in your Ultra course, you can open it in the current window or in a new window. Select the choice that works best for yous. You tin change the setting later. Select the Browser Settings icon at the top of the window.
When you find a file you want to add to your course, select the cheque box adjacent to the file name. You can go on to browse and select files. The arrangement shows how many files yous've selected at the bottom of the window. Set up to add? Select Submit to review your list of selected items.
If you want to scan the Content Collection but non add a file to your grade, y'all can access the Content Drove on the Tools folio. You tin also add links to items in the Content Collection.
Review the listing
You can review the listing of selected files before you lot import into your class. Review the Item Name, Date Modified, and Size to confirm that these are the correct files. Forgot something? Yous can add more items to the list. Select Back to Content Collection to go on browsing.
To remove or edit a file from the list, open the menu for the particular. Select Delete if you no longer desire to copy the file to your class. Select Edit to change the file'south proper name or description.

Select Salve to add the content to your class. The files are hidden to students past default so you can continue building course content.
How Content Collection files behave
When you add a file from the Content Collection to your Ultra class, the file in your course maintains a link to the original location. Keep these characteristics in mind when adding Content Collection files to your class:
- File permissions in the Content Collection don't bear upon whether a student can view a file in your form. You control visibility settings for these files the same style every bit all other content in your class.
- If a file you added to your course is updated or overwritten in the Content Collection, the file in your course reflects that alter as well.
- If a file you added to your form is deleted in the Content Drove, the file is no longer accessible in your class. The file even so appears in the Course Content folio, just an mistake appears when a user opens it. You can admission the 360° View before y'all delete Content Collection files to sympathize the impact.
- When you delete a form file that you added from the Content Collection, the file remains in the Content Collection. The just file removed is the i within your course.
Source: https://help.blackboard.com/Learn/Instructor/Ultra/Course_Content/Create_Content/Create_Course_Materials/Add_Files_Images_Audio_and_Video
0 Response to "Ally Called Me to Upload More Documents"
Post a Comment